

How to Prevent a Form from Being Saved in Dynamics 365 Using JavaScript
In Dynamics 365, there are various scenarios where business logic requires you to prevent a form from being saved. For instance, a required field might be empty, or a custom validation rule may not be met. Fortunately, Dynamics 365 allows us to use JavaScript to manage these scenarios and stop the save process when necessary.
This guide will walk you through the steps to prevent a form from being saved using JavaScript in Dynamics 365.
Step-by-Step Guide Step 1: Create a JavaScript Function
To prevent the form from being saved, we'll create a JavaScript function that will be triggered during the form's OnSave event. Inside this function, we can apply business rules or conditions and stop the save process when those conditions aren't met.
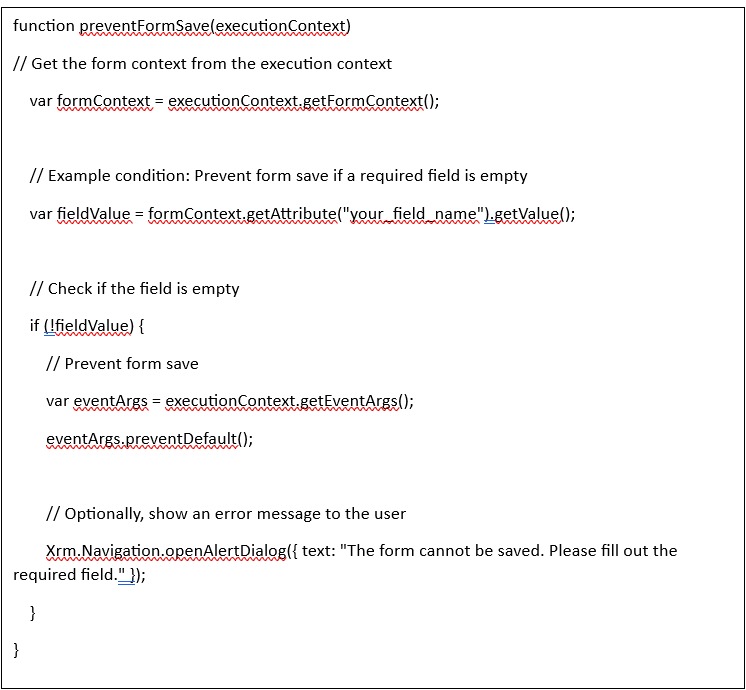
Here's an example of a JavaScript function to prevent the save if a required field is empty (You can change the Condition According to Your Requirement):
Explanation:
executionContext.getFormContext(): This method retrieves the form context, providing access to the form’s fields and controls.
getAttribute("your_field_name").getValue(): This checks the value of a specific field (replace "your_field_name" with the actual schema name of your field).
Condition Check: The condition if (!fieldValue) checks if the field is empty. If true, the save process is stopped.
Prevent Default Behavior: The executionContext.getEventArgs().preventDefault() method is used to stop the save operation.
User Notification: An alert is displayed using Xrm.Navigation.openAlertDialog() to notify the user why the form cannot be saved
Step 2: Create a Web Resource
To use this JavaScript function in Dynamics 365, you'll need to add it as a web resource:
- Navigate to Web Resources in Dynamics 365.
- Create a new JavaScript Web Resource and add the above JavaScript code.
- Save and publish the web resource.
Step 3: Add the JavaScript Function to the Form
Once the JavaScript is added as a web resource, you can link it to the form’s OnSave event:
- Open the form editor for the entity where you want to prevent the form from being saved.
- Click on Form Properties.
- In the Events tab, add the JavaScript web resource you created.
- Register the preventFormSave function on the form’s OnSave event and pass the executionContext as a parameter.
Step 4: Save and Publish
After adding the JavaScript function to the form’s events, save the form and publish the changes. Now, when users try to save the form, it will validate the condition and prevent the save if the condition isn't met.
Conclusion
Using this approach, you can control the form save process in Dynamics 365, ensuring that incomplete or invalid data doesn't get saved. This method is flexible and can be customized for various business requirements, whether it's enforcing required fields or implementing complex business rules. By harnessing the power of JavaScript and the Dynamics 365 API, you can enhance the user experience and ensure data integrity.